Styling
Cascading Style Sheets (CSS) add style to your websites. There are three possible locations for the CSS code:
- External
- The CSS is located not in the HTML document, but in an external file.
- Embedded (also called "internal")
- The CSS is located in the HTML document, between style tags
- Inline
- The CSS is located in the HTML document, inside a tag.
External styling is by far the best way to style. In fact, I'd say it is the only proper way to style now that responsive web design is the only way to go.
External CSS
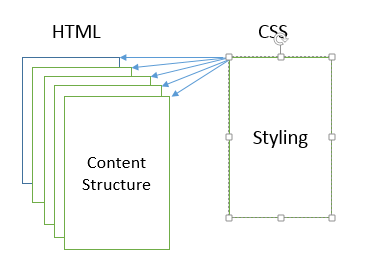
External CSS is the most powerful of the three types of CSS. With external CSS, you don't put any CSS styling in the HTML file; you put it in another file that has a .css extention. The HTML files contain the content and the structure (the tags), while the CSS file says how each page should look. Each html file gets "linked" up to the external css file. So your files are organized like this:
Using an external style sheet has three main advantages over embedded and inline styling:
- 1. Ease of maintenance
- External CSS is easy to code and to maintain, especially if your website has lots of pages. If you want to make all level two headings in your website have a red font, you can do it with one line code in the CSS file. If you decide to change the color of all level two headings to blue, you change just one line of code in the CSS file. With embedded and inline styling, to change the color of your h2 tags you have to go into every HTML file, rip out old CSS code and put in new code.
- 2. Cohesiveness
- External CSS promotes site styling consistency, so each of the pages in the website has a similar look and feel. This gives the user a sense of being in a particular place. (Don't worry, you can make unique styles, as needed, using classes, which we will cover in a bit.)
- 3. Responsiveness.
- Most importantly, external CSS separates the styling from the structure and content. This means you need maintain one and only one set of HTML files, yet you can still have different styles (layouts, font sizes, image sizes) for different viewports. Large monitors, medium sized tablets, and small mobile devices can all be styled differently with the one CSS stylesheet. This is done using media queries, which are beyong the scope of this tutorial
Applying Styles
There are three different ways to apply styling: to tags, to classes, or to an id. First, let's take a look at styling tags.
Styling Tags
h2
{
  color: #FF0000;
  font-size: 18px;
  background-color: #99FF99;
  border-style: double;
  text-align: center;
}

p
{
  color: #0000FF;
  font-family: Arial;
  font-size: 12px;
}
The above style sheet says make every level two heading <h2> have a red font color, font size of 18 pixels, background color of green, a double border, and center aligned text. The style sheet goes on to say make every paragraph <p> have blue, 12 pixel, Arial font. What are those funny numbers that change the color? They're the hexadecimal representation of the amount of red, green and blue that make up the color. You can find hex values at http://www.w3schools.com/tags/ref_colorpicker.asp. You can also use color names.
This one external style sheet will style all your html pages. Here's how you link up an HTML file to the external style sheet called crazyStyles.css. Notice the <link> tag goes in the head of the HTML document (between the head tags). Let's call this HTML page birds.html.
<!DOCTYPE html>
<html lang="en">
<head>
  <title>The title goes here</title>
  <meta charset="utf-8">
  <link href="crazyStyles.css" rel="stylesheet">
</head>

<body>
<h2>Cardinals</h2>
<p>The male cardinal is a beautiful bright red, whereas the female is a less colorful brown.</p>
<h2>Bluebirds</h2>
<p>Bluebirds are a beautiful shade of blue, but are difficult to attract to your garden. </p>
</body>

</html>
In order for birds.html and crazyStyles.css to link up properly, they must be in the same directory. If they are in different directories, you will need to change the html link coding to reflect the correct relative path to crazyStyles.css.
You're probably thinking: all of the html pages will look the same. That's true. We style tags to give our site a consistent look and feel. But what if you want something on just one html page to look a little different? That's easy, use a class. We will get to classes in a bit.
Here are a few examples of how the appearance of one html page, birds.html, can be changed with different style sheets. The html code for each of the below files is the same. The only thing that has changed is the style sheet that is linked to the html.
You can view the HTML code for an html page by right-clicking > view [page] source. The HTML code will show you the name of the style sheet to which it is linked; you can use that name to view the style sheet code in the browser.
Styling Classes
Styling tags in an external style sheet promotes site consistency. But occasionally you want something on just one page to be different. You can do this using classes. Styling using classes is a little different than styling tags, but the same basic techniques apply.
A class is a collection of styles that you want to apply together. For example, if you are creating a site about aliens, you may want the names of aliens to appear in green italics. Here is how to create a class named alien.
/* Notice the dot before the class named alien*/
/* The dot before the class name  is very important */
/* You've probably figured out, this is how you do a comment in CSS */

h2
{
   color: #FF0000;
   font-size: 18px;
   background-color: #99FF99;
   border-style: double;
   text-align: center;
}

p
{
   color: #0000FF;
   font-family: Arial;
   font-size: 12px;
}

.alien
{
  font-style: italic;
  color: #00FF00;
}
Once you've created a class, it does nothing until you've applied it. You create the class in the external CSS style sheet, and you apply the class in the html document, like this:
<!DOCTYPE html>
<html lang="en">
<head>
  <title>The title goes here</title>
  <meta charset="utf-8">
  <link href="crazyStyles.css" rel="stylesheet">
</head>

<body>
<h1>Earthlings</h1>
<p>Earthlings are not aliens. They live on a planet named Earth. Earthling are not green, so we do not want to apply the alien class to them.</p>
<h1 class="alien">Martians</h1>
<p>On the planet Mars you may find some <span class= "alien">Martians</span>. They may very well be green. All of the <span class="alien">martians</span> I have known have been very friendly creatures. </p>
</body>

</html>
Applying the alien class to the level one heading that says Martians makes only that level one heading appear in green italics. Other level one headings are not affected. If you want all of the level one headings in your site to be green italics, you would be much better off styling the h1 tag in the external style sheet. A tag that is styled does not need to be applied; tag styling takes effect as soon as the CSS file is linked to the html file.
You can apply a class to any tag. So <p class="alien"> makes the text in that paragraph appear in green italics. The styling continues until the paragraph is ended with </p>.
If you want to apply the alien class to some word or words that are not surrounded by a tag, there is a special tag for that, the <span> tag. The <span> tag does no formatting by itself. It is used only to apply classes to spans of text.
As you can see from the above example, a class can be applied as many times as needed in an html document.
Styling ids
The final way to apply styles is to identify something in an HTML document, and then style that id. It's similar to styling a class, but we use a hashtag [ # ] rather than a dot in front of the name of the id in the CSS stylesheet. First, though, we have to identify something in the HTML code, as follows:
<!DOCTYPE html>
<html lang="en">
<head>
  <title>Styling Example</title>
  <meta charset="utf-8">
</head>

<body>
<h2>Cardinals</h2>
<p>The male cardinal is a beautiful bright red, whereas the female is a less colorful brown.</p>
<h2>Bluebirds</h2>
<p>Bluebirds are a beautiful shade of blue, but are difficult to attract to your garden. </p>
<p id="copyrightInfo"> © 2017 Matilda Q. Ampersand</p>
</body>

</html>
The id="copyrightInfo" code is placed within a tag; most any tag will do. The copyrightInfo id uniquely identifies a place in the HTML; you cannot use the copyrightInfo id more than one time in an HTML document. An id must be unique because it is used for other things, such as a target for a link or a handle to which we can attach a javascript behavior.
Once we've identified a particular portion of the HTML document, we can style it in our external style sheet the same way we styled a class, except we use a hashtag rather than a dot.
/* Use a dot before a class name */
/* Use a hashtag before an id */
/* Notice we put all three kinds of styling, tags, classes, and ids, in the same stylesheet */

h2
{
  color: #FF0000;
  text-align: center;
}

.alien
{
  font-style: italic;
  color: #00FF00;
}

#copyrightInfo
{
  text-align: center;
  font-size: 0.8em;
}
Do you like to style? Here are just a few of the hundreds of properties that can be styled:
| Property | Possible Values |
|---|---|
| background-color | hex value, rgb value, name |
| border-style | solid, double, dotted |
| border-color | hex value, rgb value, name |
| color | hex value, rgb value |
| font-family | arial, courier, etc |
| font-size | # of pixels, ems, pts |
| letter-spacing | # of pixels, ems, pts |
| line-height | # of pixels, ems, pts |
| text-align | right, left, center |
You can find hundreds of style properties and values at http://www.w3schools.com/cssref/default.asp. Have fun styling!